Wise Review: Best International Money Transfer Service for Freelancers
When choosing an international money transfer service provider, the most enticing factors are speed, ease of use, and good rates.
In my experience as a freelance writer in Kenya, using Wise (formerly TransferWise) for the past several years has proven to be the best decision. Wise checks all the boxes of an ideal money transfer brand and then some.
(Note that this post contains affiliate links).
If you don’t have a Wise account yet, create one here and get better and faster transfers with unbeatable exchange rates.
But, what is Wise? How does it work? How do you send or receive money with Wise? Read on for full details on all these. I’ll also give you an exhaustive list of the reasons why Wise is the best international account for freelancers. So stick around to the very end.
What is Wise?
Wise is an international money transfer service provider based in London. It was launched in 2011 by two Estonian friends—Kristo Käärmann and Taavet Hinrikus.
Initially, the company was called TransferWise, but after expanding its services beyond just facilitating money transfers, it changed its name to Wise.
Besides enabling users to send money to over 160 countries worldwide, Wise offers its customers multi-currency accounts, business accounts, and debit cards.
The company’s vision is to provide fast, easy, low-cost, and fair money management across international borders.
But here’s another common question I get asked. Seeing that Wise provides a good deal of money-related services like banks, is it a bank? Is it better than a bank?
Is Wise a bank?
Wise is not a bank. The company refers to itself as an “electronic money institution.”
Most people use the term “money transfer service provider,” although they offer more than just money-transfer services.
The difference between a Wise account and a bank account include:
- You can’t get a loan with Wise like with a bank account
- There’s no account overdraft with a Wise account
- Wise doesn’t offer any interest
- It protects money by “safeguarding” it in Wise as opposed to Financial Services Compensation Scheme (FSCS) with a bank account.
Using a Wise account for international transactions is better than a bank account mainly because you avoid hefty international money transfer fees. Additionally, Wise is renowned for offering the best exchange rates.
How does Wise work?
Using Wise is simple. Once you’ve created an account and logged in, you can deposit money from your country in your local currency and send it to someone abroad in a different currency.
Additionally, you can receive money from someone in a different country.
Their local bank accounts worldwide facilitate Wise’s money transfer across various countries.
Here’s an example of how this process happens.
Let’s say a freelance writing client in the US pays their writer in the UK $500 via Wise.
The client will deposit US dollars from their bank in the US into their Wise account. Wise’s bank account in the US will receive the money and then notify their local bank account in the UK.
So, when the writer withdraws the amount in pounds from their Wise account, that money will be released to them from Wise’s account in the UK.
Therefore, the money sent overseas doesn’t actually cross any borders. Because of that, transactions are faster and cheaper.
Wise features
The main features that come with a Wise account are multi-currency account, international money transfer, Wise debit card, and business account. These features are what make this fintech company the convenient money management service provider it is.
International money transfer
Wise was formerly named TransferWise because the company solely offered money transfer services. After adding on to their services, they changed it to Wise.
However, international money transfer is still the company’s top capability.
Fast, easy, and cheap.
That’s what Wise money transfer is known for.
You can send or receive money from someone overseas using Wise in seconds or minutes. For freelance writers in Kenya, for example, this is ideal because it means you get money as soon as your international client pays you.
Note that if your client pays you from their local bank account to your Wise account, it may take 1-3 days to arrive at your end. But as soon as it’s in your Wise account, you can withdraw it instantly.
Currently, Wise gives you one account to spend, send and receive. Hold money in over 40 currencies.What’s more, Wise money transfer offers the best exchange rates in the market because they use mid-market rates (the rate you’d find in Google), unlike other providers and banks.
Most traditional banks and most other digital money institutions mark up the exchange rates to increase their profits on each international transaction. Wise, on the other hand, has no such hidden costs.
The level of transparency with Wise money transfer services is also worth noting. Wise displays its exchange rates and different transaction fees (depending on the currency) on its home page and when processing any transactions. So you can know how much it will cost you for each transaction upfront.
Multi-currency accounts
For anyone with an international lifestyle, this feature is worth getting your own Wise account for.
For example, as a freelance writer, you can easily work with clients from different countries globally. So how do you receive payments if the client wants to pay you in their local currency?
Well, the Wise multi-currency account allows you to receive, hold, spend, and send money in over 50 currencies.
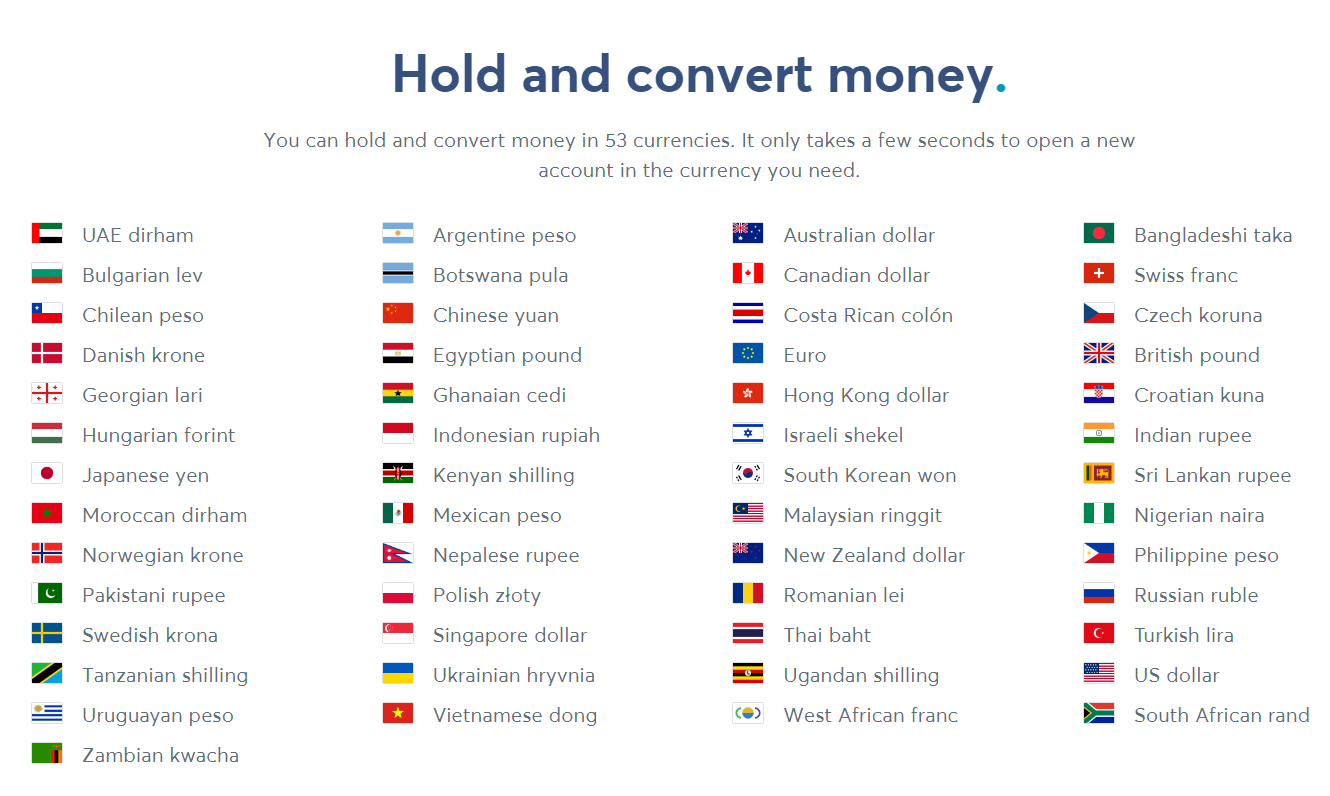
Your multi-currency account allows you to make any of these transactions in a few clicks. And that’s not all. You can convert currencies whenever you need to, at the real exchange rate.
With the multi-channel account, you acquire international bank details in up to 10 currencies:
- British pound
- US dollar
- Euro
- Australian dollar
- New Zealand dollar
- Singapore dollar
- Canadian dollar
- Romanian lei
- Hungarian forint
- Turkish lira
Submit these bank details to receive money or get paid from any of these countries just like a local there would.
You can also spend the different currencies in their multi-currency account via the Wise app, the website, or even an ATM using the Wise debit card.
Wise debit card

Let me start with a disclaimer. At the time of writing this article, the Wise debit card is not available to Wise users in all countries, e.g., Kenya. You can find out if it’s available in your country.
The company is working toward making its cards available everywhere. However, the perks of using the Wise card are mind-blowing. I just have to tell you about them here as we look forward to having them made available to users based in Kenya.
The Wise card is a debit card, not a credit card. You can use it locally or internationally. When used abroad, it’s the most convenient card.
You can hold over 50 currencies on your card and withdraw money from over 200 countries worldwide.
Spending in a currency that’s on your card is free. In fact, Wise offers free withdrawal for the first $100 you take out in a month. And any amount after that is charged a significantly low withdrawal fee.
In case you need to spend in a currency that your card doesn’t hold, you can convert the currency you have at the cheapest rates.
In short, using the Wise debit card abroad is 4X cheaper than using bank cards, transacting online, or getting the local currency in person.
Here’s a table comparing Wise’s rates and other providers.

Another advantage of using the Wise debit card is that there are no ongoing charges. You only pay a one-time fee of $9 to get the card.
It’s also secure to use. You’ll receive a notification on your app for every transaction you make. You can also check your balance on the Wise app. And in case your card gets lost or is stolen, you can freeze it instantly to avoid any money theft.
With all these benefits, you’re probably as eager as I am to get the Wise debit card once it’s available to Kenyan-based users. So open your free Wise account today, and register on the waitlist to be notified when the cards will be available.
Business accounts
If you run a business and regularly receive and send money internationally, then a Wise business account is what you need.
The business account offers much of what you get with an individual account, plus some additional capabilities. For example, you can:
- Save on costs by paying your employees abroad in their local currency
- Pay international vendors and invoices
- Receive payments from your clients
- Integrate your Wise account into your online shop
- Save time on administrative matters by integrating your business account with Xero (an online accounting software)
- Allow your team to access your Wise business account while controlling their permissions to make workflow easier
How to use Wise international money transfer
You can use Wise to receive, hold, or send money from different countries and in more than 50 currencies.
Before you access any of these services, you must first open an account.
How to open an account on Wise (formerly TransferWise)
Opening a Wise account is fast and easy.
- Go to the sign-up page on the Wise website.
- Enter your details: full name and email address
- Create a strong and secure password.
- Alternatively, sign up using your Facebook or Google account
- You will receive a verification email from Wise.
- Complete the verification process by following the instruction in the email.
- Once your account is verified (it can take a few days), your account is ready to use.
NOTE: The verification process is necessary to keep your account safe. Wise will ask you to verify your identity when you first create an account or initiate your first money transfer.
You will need two documents for this:
- Identification document: Your national ID will do
- Small Deposit: Wise will ask you to deposit a small amount of money to verify your identity. Right now, it’s Sh. 2,500 for Kenyans. I talk more about how to deposit money to Wise shortly.
Sometimes Wise may also ask for a selfie of you holding your ID.
Once you deposit the Sh. 2,500 from your card to Wise, you can withdraw it back to your bank or mobile money account instantly.
Receiving money with Wise
Here are the steps to receive money with Wise:
- Ask the sender what currency they are sending the money in.
- Log in to your Wise account.
- Go to your dashboard/home page and click “open account” in the left column to create a currency account.
- Once you’ve created an account for the currency you need, go back to your dashboard.
- Click on the required account, then select “account details.”
- Send the account details to the person sending you the money.
- The person will fill in those details on their end and send you the money.
You will receive the amount in your Wise account in a few seconds or minutes if the sender sends it via their credit card, debit card, or Wise account. If they send via their local bank account, it may take a few days to arrive in your Wise account.
Fun fact: You can choose to receive money send to your Wise email. You’ll just select the primary currency you want to receive that money in. When your client sends money to your Wise email, and you set up M-Pesa as the primary way to receive cash, the cash will come straight into your M-Pesa.
Withdrawing money from your wise account
Note that you’ll not always have to “withdraw” cash. As stated above, you can set it up such that when a client pays you, the cash doesn’t “land” in your Wise account first. It comes straight to your bank or M-Pesa.
However, some clients may pay straight into your Wise account. In such cases, here’s how to withdraw:
- Login to your Wise account
- Select the currency account you want to withdraw money from
- If you withdraw the money to your bank account or mobile wallet, select send to “myself.”
- Select the currency (this will be your local currency if you are withdrawing to a local bank)
- Enter the bank details.
NOTE: For Kenyan users, you can enter your M-Pesa details if you want to withdraw via M-Pesa
- Key in the amount you want to withdraw.
- Click continue, then select “confirm” after verifying the details.
You can track your withdrawal until your money arrives.
Depositing money into your Wise account
- Login to your Wise account
- On your dashboard / home page, select the account you’d like to deposit money into.
- Click on the “Add” button at the top.
- Select the currency to pay with. Wise will show you the fees you will pay and the amount after conversion.
- Choose your payment method. For some countries like Kenya, the international wire (SWIFT) payment option works best in since it’s still not possible to deposit to Wise using a card. If you’re able to use a card in your area, that’s the fastest. The next steps are for someone who’s using the international wire method. Select to proceed at your bank’s branch.
- Choose USD as the top-up currency
- Write down the Wise bank details—Name, Account Number/IBAN, SWIFT, etc.
- Click on the “I need to finish this later” button.
- Walk to your bank and request the Application For Funds Transfer Form. Fill it in. Hand it to the teller. Make sure you fill in the reference number Wise gives you. Without that, the transaction will not go through. If you don’t want to go to your bank physically, you can do international transfer using your bank’s mobile app.
- Click on the “I’ve now paid” button in the Wise Account.
- Check for an email for a response from Wise.
*Important note: At the time of updating this, the bank transfer above can cost you up to Sh. 4,500 in fees.
Advantages of using Wise

What makes Wise stand out from the many money transfer service providers?
Here are the advantages of using Wise.
1. Account opening and maintenance is free and easy
Signing up to Wise is free—you also pay nothing to maintain the account. There are no monthly costs.
The only information you need to create a Wise account is your name and email address, and then create a strong password. You can also sign up using your Facebook or Google account.
After signing up, Wise will send you a verification email. Simply follow the instructions you’ll be given there to complete the process.
After that, you can literally verify it in minutes and your account will be ready to receive payments from clients globally or send money to people abroad.
2. Best exchange rate
Wise offers the best exchange rates than any other money transfer provider. For example, a few days ago (22nd Sep 2022), I got the dollar at Sh. 120.60. That’s a far better rate than other platforms offer. By far.
The exchange rate at Wise is so good because they use the mid-market rate without adding any markups (which is what other providers and banks do to increase their profits).
3. Low, transparent fees
As mentioned, Wise is one of the cheapest international money transfer providers.
Moreover, they openly show their rates and fees, so you know how much you’ll be charged upfront—no need to worry about any hidden costs that may pop up later after you initiate a withdrawal.
These low fees and high exchange rates mean you get the most cash by getting your payment through Wise.
4. Fast withdrawal from Wise to local banks and M-Pesa
Withdrawing cash from your Wise account is very easy and fast. You can withdraw to a local bank here in Kenya or your M-Pesa.
The process only takes a few seconds or a few minutes.
5. Zero charges to withdraw from Upwork to Wise
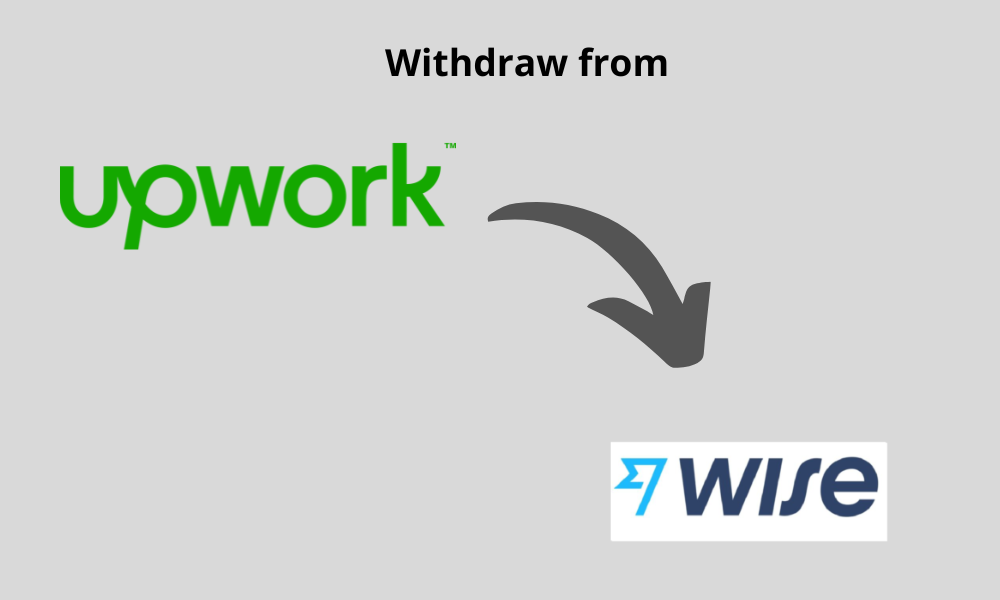
Upwork is one of the best freelancing job boards, and many Kenyan freelancers get their jobs there. (If you haven’t mastered Upwork, enroll in my course here to learn how to get the best clients on the platform).
Once your client sends payment on Upwork, you can withdraw the funds through Wise. The process is simple and will cost you ZERO fees.
Here’s how to withdraw your cash from Upwork to Wise.
How to withdraw from Upwork to Wise
- First, set up your USD account on Wise.
- Get the USD account details.
- Go to “Settings” on Upwork
- Under the user settings, select “Get paid.”
- Under Payment Methods, click on “Add method.”
- Select Set up “Direct to U.S. Bank (USD).” Notice that this payment method is free, while all the others charge a withdrawal fee.
- Fill in your USD account details from Wise, then click “Add Bank Account.”
That’s all. You can now withdraw your payments from Upwork into your Wise USD account.
NOTE: Withdrawing from Upwork to Wise is preferred when dealing with payments above $100. For smaller amounts, the Wise fees you’ll be charged when withdrawing to your M-Pesa negate the dollar rate advantage; thus, you can use M-Pesa withdrawal directly from Upwork.
Why is Wise a better option to withdraw from Upwork
Once your client sends payment on Upwork, you can withdraw the funds through Wise, M-Pesa, Payoneer, or your local bank. Out of these withdrawal methods, Wise is the better option because:
- It costs zero fees to withdraw to your Wise account from Upwork. All the other withdrawal methods charge between $0.99 – $30 per withdrawal.
- You’ll get the best dollar rate on Wise.
- Withdrawing from Wise to your M-Pesa or local bank is fast (mostly a few seconds).
6. Withdraw from Payoneer to Wise
If your clients pay you through Payoneer, you can still take advantage of the excellent exchange rate on Wise by transferring your money from Payoneer to Wise.
This is an easy process. Since Wise allows you to create accounts for different currencies, you can simply take the account details and send your money from Payoneer to that account.
Once the money arrives in your Wise account, you can withdraw via mobile money or to your local bank account at amazing exchange rates.
7. Invoice your client from your Wise account

You can request money from anyone anywhere from your Wise account. Better still, Wise has a free invoice generator. It’s simple and easy to use.
8. Make money by inviting your friends to sign up

Earn £50 by inviting three people to sign up to Wise using your unique invite link. You will get these earnings once each of the three referrals transfers over £200 in one go.
Your three referrals also benefit from this. They’ll each get to transfer up to £500 free.
So once you create a Wise account, you can get your invite link by clicking on the “Earn £50” tab on your dashboard. Share this link with your friends on social media or via email, and start earning £50 for every three qualified referrals you make.
Disadvantages of using Wise
Like everything else in life, there are some downsides to using Wise.
- Their phone support is not always available.
- Not all currencies worldwide are supported.
- The Wise debit card is not available for all users in every country.
Get started with Wise
Judging from all the services and great perks users get from using Wise for international money transfers, it’s definitely worth having your own account. And since it’s free to open an account, you can get started today.